In my 12 years of reviewing CAD assemblies and mechanical Bills of Materials (BOM) at eptahub.com, few fasteners are as universally misunderstood by junior designers as the rivet. When someone asks me, “how to define rivet?”, they are usually looking for a simple dictionary answer.
Jika anda mencari What does rivet mean in slang? you will find it means to be completely engrossed or fascinated by something (e.g., “a riveting performance”). However, on the factory floor, there is absolutely no room for linguistic ambiguity.
To an engineer, what is the definition of a rivet?
A rivet is a permanent, non-threaded mechanical fastener consisting of a smooth cylindrical shaft with a pre-formed head on one end. Upon installation, the opposite end (the tail) is mechanically deformed to create a second head, securely clamping two or more pieces of material together.
Unlike bolts or screws, which rely on friction and thread tension (and can vibrate loose), a properly installed rivet relies on structural deformation. It fills the mounting hole completely, creating an incredibly rigid, vibration-proof joint. You cannot disassemble a riveted joint without physically destroying the fastener.
What Are the 4 Types of Rivets?
Before you can specify a fastener, you must know what is available. While there are dozens of niche variations, modern industrial manufacturing relies on four primary categories of rivets. Understanding these is the first step in learning how to identify rivets on a technical drawing.
1. Solid Rivets (The Structural Heavyweight)
This is the original, oldest type of rivet, famously used in constructing the Eiffel Tower, the Golden Gate Bridge, and modern aircraft fuselages. It is a solid cylinder of metal with a head.
- Mechanics: To install a solid rivet, you need access to kedua-duanya sides of the assembly. A massive amount of force is applied to the tail (usually via a pneumatic rivet gun and a heavy bucking bar) to smash the tail into a “buck-tail.”
- Engineering Application: Specified when absolute maximum shear and tensile strength are required, and when the assembly is subjected to extreme, continuous vibration (aerospace).
2. Blind Rivets / Pop Rivets (The Assembly Line Standard)
When a designer asks me how to set rivets in metal when they only have access to one side of the enclosure (like a tubular frame or a closed box), the answer is the blind rivet.
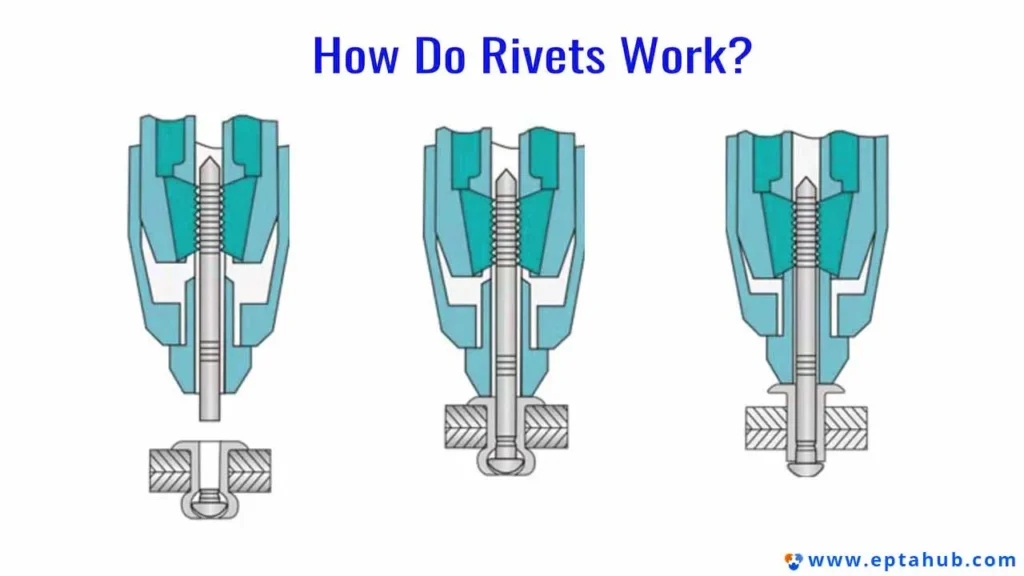
- Mechanics: A blind rivet consists of a hollow tubular body and a central mandrel (a nail-like pin). A specialized tool pulls the mandrel through the hollow body, expanding the blind side of the rivet until the mandrel deliberately snaps off at a predetermined tension.
- Engineering Application: Standard sheet metal fabrication, automotive bodywork, and HVAC ducting. They are exceptionally fast to install but offer lower shear strength than solid rivets because the core is hollow (or plugged by the snapped mandrel).

3. Semi-Tubular Rivets (The Pivot Point)
These look like solid rivets but feature a shallow hole drilled into the tip of the tail.
- Mechanics: Because the tail is hollow, it requires drastically less force (about 1/4 the force of a solid rivet) to roll the edge outward and secure the joint.
- Engineering Application: They are frequently used when a joint needs to pivot or rotate (like folding ladders, scissors, or automotive brakes). They are also the standard when asking how to set rivets in leather or plastic, as the low installation force prevents crushing the soft base material.
4. Blind Rivet Nuts / Rivnuts (The Thread Creator)
Often, an engineer needs to bolt a heavy component onto a piece of kepingan logam that is too thin to tap with internal threads. In this scenario, we use a rivet nut.
- Mechanics: Knowing how to set rivet nuts is crucial for enclosure design. It installs exactly like a blind rivet (from one side), but instead of a solid tail, it leaves behind a permanently captive, internally threaded nut.
- Engineering Application: Electronic chassis panels, automotive dashboards, and aerospace interiors where components must be repeatedly bolted and unbolted from thin-walled structures.
How to Specify a Rivet?
The most common failure I see in mechanical assemblies at eptahub.com is not the wrong type of rivet, but the wrong size. You cannot guess the dimensions. If you are asking How to specify a rivet?, you must calculate two critical geometric values based on the thickness of the materials you are joining (known as the Grip Length).
Step 1: How to Determine Rivet Diameter
The diameter of the rivet dictates its shear strength—its ability to resist forces sliding parallel to the joint. If the diameter is too small, the rivet will simply shear off like a guillotined pin. If the diameter is too large, the required hole will remove too much material from the base plates, weakening the overall structure.
- The Engineering Rule of Thumb: The diameter of the rivet (d) should be approximately 3 times the thickness of the thickest plate being joined.
- Contoh: If you are riveting a 2mm aluminum sheet to a 1mm aluminum sheet, the thickest plate is 2mm. Therefore, your optimal rivet diameter is 3×2mm=6mm. (In practice, you would select the closest standard size, such as a 6.4mm or 1/4″ rivet).
Step 2: How to Determine Rivet Length
Calculating the length is where catastrophic errors occur. The length of the rivet (L) must equal the total thickness of the materials being joined (the Grip Length) plus enough extra material to successfully form the buck-tail.
If the rivet is too short, the formed tail will be too small and will pull right through the hole (pull-out failure). If the rivet is too long, the shaft will bend and buckle inside the hole before the tail forms, resulting in a loose, rattling joint.
- The Solid Rivet Formula: L=Grip Length+(1.5×d)
(Where d is the diameter of the rivet. The 1.5 multiplier provides the exact volume of metal needed to form a standard flat buck-tail). - The Blind Rivet Formula: Blind rivets are sold by “Grip Range” (e.g., 0.126″ – 0.250″). You simply measure your total material thickness and select a blind rivet where your thickness falls perfectly into the middle of that specified grip range.
Engineering Sizing Matrix: Standard Solid Rivet Calculation
To give you a quick reference for your CAD models, here is a standard calculation matrix for determining solid rivet dimensions.
| Material 1 Thickness (t1) | Material 2 Thickness (t2) | Total Grip Length (G) | Calculated Optimal Diameter (d=tmax×3) | Standard Diameter Selected | Required Rivet Length (L=G+1.5d) |
|---|---|---|---|---|---|
| 1.0 mm | 1.0 mm | 2.0 mm | 3.0 mm | 3.2 mm (1/8″) | 2.0+(1.5×3.2) = 6.8 mm |
| 2.0 mm | 1.5 mm | 3.5 mm | 6.0 mm | 4.8 mm (3/16″) | 3.5+(1.5×4.8) = 10.7 mm |
| 3.0 mm | 3.0 mm | 6.0 mm | 9.0 mm | 6.4 mm (1/4″) | 6.0+(1.5×6.4) = 15.6 mm |
(Note: Always round up to the nearest standard commercially available rivet length, and specify the exact hole tolerance on your technical drawings—usually 0.1mm larger than the rivet diameter).
Engineering Case Study: The Catastrophic Failure of Incorrect Rivet Length
To emphasize why these mathematical formulas matter, let me share a failure analysis we conducted at eptahub.com for a client manufacturing heavy-duty commercial HVAC rooftop units.
Senario: The client was assembling the external galvanized steel chassis of the HVAC unit. The design called for joining two overlapping sheets of 16-gauge (1.5mm) steel. The total Grip Length was exactly 3.0mm. The junior engineer specified a 4.8mm (3/16″) aluminum blind rivet with a grip range of 1.5mm to 3.2mm.

The Hidden Failure: On paper, the 3.0mm material thickness fit within the 1.5mm – 3.2mm grip range. However, the engineer failed to account for the manufacturing reality of sheet metal burrs.
Because the punched holes were not deburred perfectly on the factory floor, the two sheets of steel did not sit perfectly flat against each other. There was a microscopic 0.5mm gap between the plates. This pushed the sebenar physical grip length to 3.5mm—exceeding the maximum capacity of the chosen rivet.
Hasilnya: When the pneumatic tool pulled the mandrel, the blind side of the rivet tried to expand di dalam the hole rather than against the back of the bottom sheet. The joint felt tight on the assembly line, but there was virtually no structural clamping force. Once the HVAC units were installed on commercial rooftops, the heavy vibration of the internal compressor fans caused the rivets to experience severe shear stress. Within six months, the rivets sheared off, and the chassis panels began rattling violently, leading to massive warranty claims.
Resolusi Kejuruteraan:
We redesigned the assembly process with three rigid BOM changes:
- Mandatory Deburring: Added a step to the SOP to ensure all sheet metal holes were fully deburred, ensuring a true metal-to-metal mate.
- Upgraded Material: Shifted from an Aluminum/Aluminum blind rivet to a Steel/Steel blind rivet to match the galvanic properties of the chassis and drastically increase shear strength.
- Corrected Grip Range: Specified a new blind rivet with a grip range of 3.2mm to 4.8mm. This ensured that even if a slight gap existed, the blind head would fully form behind the bottom plate, creating a permanent, high-tension mechanical lock.
The lesson here is absolute: When asking how to specify a rivet, you must calculate not just the theoretical CAD dimensions, but the physical reality of the factory floor assembly.
How to Set Rivets in Metal: The Industrial Standard
When engineers discuss how to set rivets in metal, we are primarily dealing with high-shear structural applications (aerospace, automotive, HVAC).
1. Setting Blind Rivets (Pop Rivets) in Sheet Metal:
This is the most common assembly line operation.
- Prosesnya: You drill a clearance hole through both plates (typically 0.1mm larger than the rivet body). Insert the blind rivet through the hole until the flange sits perfectly flush against the top plate. Slide the nosepiece of a manual, pneumatic, or battery-operated rivet gun over the protruding mandrel (the central nail).
- Fizik: Squeeze the trigger. The tool pulls the mandrel aggressively backward while pushing against the flange. The ball at the end of the mandrel forces the hollow tail of the rivet to flare out radially behind the bottom plate. Once the flare compresses the plates together with maximum tension, the mandrel reaches its ultimate tensile strength and snaps off with a loud pop.
2. Setting Solid Rivets with a Squeezer:
For high-end aerospace or aircraft frames, we do not use impact force if we can avoid it. We use a pneumatic or hydraulic “squeezer.” This C-shaped tool features two cupped dies. It slowly and silently crushes the solid rivet tail with thousands of pounds of hydraulic pressure. This creates a perfectly uniform, work-hardened buck-tail without damaging the surrounding delicate aluminum skin.
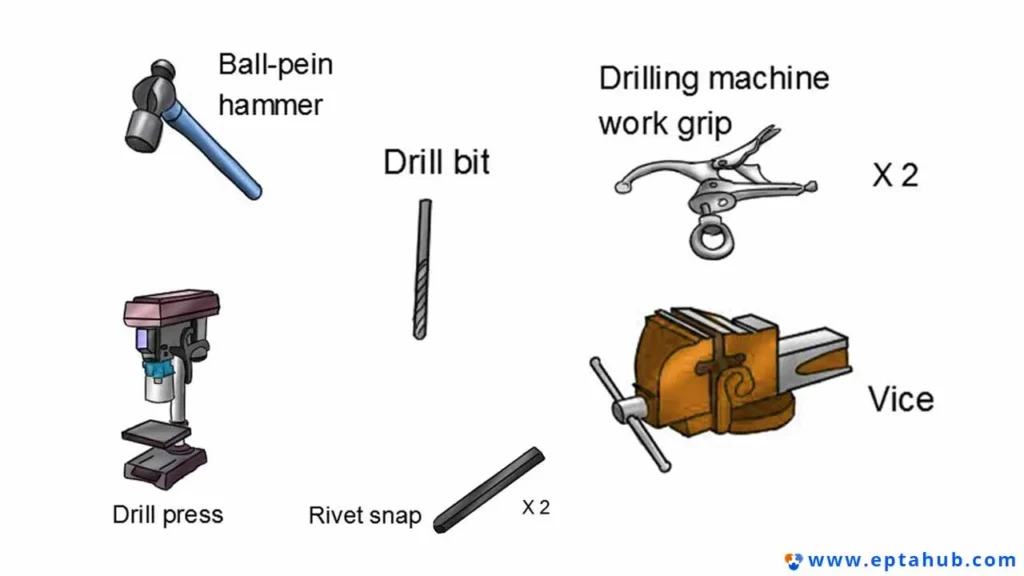
How to Set Rivets with a Hammer?
Not every operation has access to hydraulic squeezers. When performing field repairs, custom fabrication, or restoring vintage machinery, you must know how to set rivets with a hammer.
Warning: You cannot simply hit a solid rivet flat with a standard framing hammer. Hitting it flat will bend the shank inside the hole, completely destroying the joint’s shear strength.
The Proper Engineering Technique:
- The Anvil (Bucking Bar): The factory head of the rivet must be supported by a massive piece of hardened steel, known as a bucking bar or anvil. If the head is not supported, your hammer blows will simply push the rivet out of the hole.
- The Rivet Set: You place a “rivet set”—a specialized steel punch with a concave dimple matching the rivet head—over the factory head to protect its shape.
- The Peening Process: Using a ball-peen hammer, you strike the protruding tail of the rivet. You do not hit it dead-center immediately. You use the rounded “ball” end of the hammer to strike the edges of the tail in a circular motion. This “peens” or mushrooms the metal outward radially, filling the hole completely.
- The Finish: Once the metal is mushroomed, you flip to the flat face of the hammer and strike it dead-center to flatten the buck-tail against the base metal, securing the joint.
Navigating Soft Materials: Leather and Fabric
At eptahub.com, we frequently review Bills of Materials for tactical gear, heavy-duty tarps, and industrial safety harnesses. The rules for metal do not apply here.
If you use a high-tension steel blind rivet on canvas or leather, the clamping force will act like a hole punch. The moment load is applied, the rivet will tear straight through the soft material.
How to Set Rivets in Leather
When specifying hardware for thick leather (belts, tool pouches, horse tack), you must distribute the clamping load over a wide surface area. This dictates how to set rivets in leather.
We typically specify Copper Rivets and Burrs atau Double-Cap Rivets.
- Copper Rivet & Burr Installation: You push a solid copper rivet through the punched leather. A tight-fitting copper washer (the burr) is forced down over the shaft until it compresses the leather. You then use heavy nippers to cut the copper shaft, leaving just 2mm protruding. Finally, using a domed setting tool and a mallet, you peen the soft copper shaft over the washer. The washer prevents the rivet from pulling through the leather.
- Double-Cap Rivets: These are snap-together tubular rivets used for lighter leatherwork. They have a finished cap on both ends. You punch a hole, push the post through, snap the cap on, and use a specialized concave anvil and setting punch. You strike the punch with a mallet to gently compress the internal tube, locking the caps together without crushing the leather.
How to Set Rivets in Fabric
The challenge of how to set rivets in fabric (like Kevlar, nylon webbing, or canvas tarps) is preventing the woven fibers from fraying around the hole.
- The Engineering Solution: You must never drill fabric; the drill bit will catch and unravel the weave. You must use a sharp, heated hole punch to melt or cleanly sever the fibers.
- The Hardware: For fabrics, we almost exclusively specify Tubular Rivets atau Grommets/Eyelets paired with massive backing washers. The wide flange of the grommet or the backing washer ensures the mechanical load is distributed across hundreds of individual fabric threads, preventing tear-out under high wind or tension loads.
Field Operations: How to Set Rivets Without a Tool
Occasionally, a technician in the field needs to repair a linkage or a canvas strap and does not have a specialized pop-rivet gun, a bucking bar, or a concave rivet set. When you search for how to set rivets without a tool, you are looking for an improvised engineering solution.
Disclaimer: Improvised setting methods should never be used on load-bearing structural joints (like automotive suspensions or aircraft).
Improvising a Tubular Rivet Setting:
If you need to set a semi-tubular rivet or a grommet and lack the specialized flaring die:
- The Base: Place the factory head of the rivet against a hard, flat metal surface (the flat spot on a bench vise or a heavy steel plate).
- The Improvised Flare: Take a steel ball bearing that is slightly larger than the hole in the tubular tail of the rivet. Place the ball bearing on top of the hollow tail.
- The Strike: Strike the ball bearing squarely with a flat hammer. The spherical shape of the ball bearing will act exactly like a flaring die, perfectly rolling the edges of the tubular rivet outward. Finish by removing the ball bearing and lightly tapping the flared edges flat with the hammer.
Soalan Lazim
To optimize your production line and troubleshoot common failures, here are the most frequent technical questions we field regarding rivet installation.
Q1: I installed a blind rivet, but the mandrel (stem) snapped off above the flange, leaving a sharp pin sticking out. Why?
This is a classic failure called “proud mandrel.” It happens for two reasons. First, your grip length calculation was wrong—the rivet was too long for the thin material, so the mandrel snapped before it could pull fully into the body. Second, the nosepiece on your rivet gun is worn out or the wrong size, preventing the jaws from gripping the mandrel deep enough.
Q2: Can I remove a rivet once it is set?
Rivets are permanent fasteners; they cannot be unscrewed. To remove a rivet, you must destroy it. The engineering standard is to drill it out. Select a drill bit exactly the same size as the specified rivet diameter (not the hole diameter). Center-punch the exact middle of the rivet head. Drill straight down just until the factory head spins off on the drill bit. Then, use a parallel pin punch to tap the remaining shaft completely out of the hole. Do not drill all the way through, or you will enlarge the base hole.
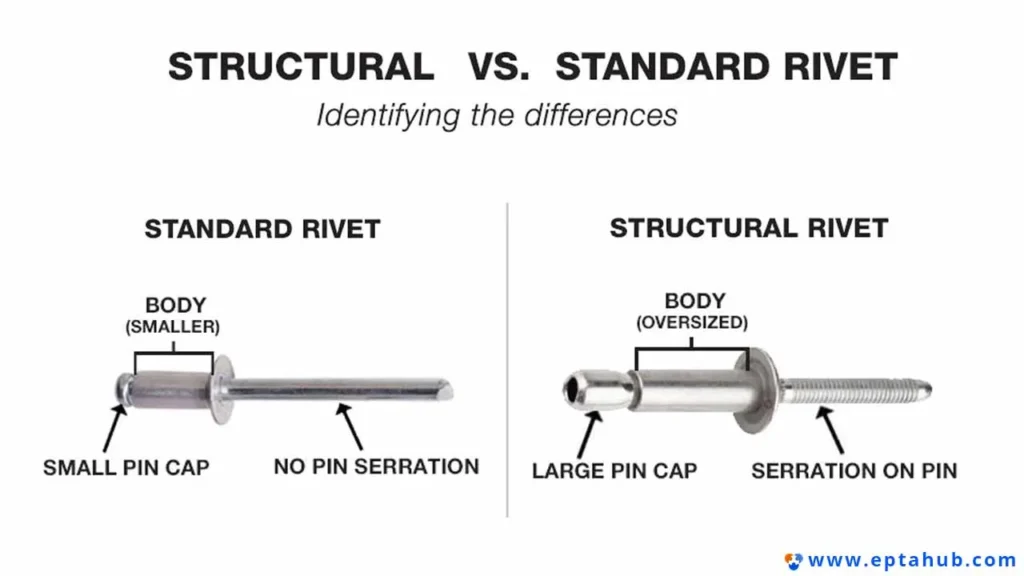
Q3: How to identify rivets visually on a piece of machinery?
- If it has a solid, smooth, domed head on one side, and a smashed, irregular mushroom of metal on the back, it is a Solid Rivet.
- If it has a smooth flange on the front with a tiny hole in the exact center (where the mandrel snapped), and a bulged, hollow tube on the back, it is a Blind (Pop) Rivet.
- If it has a rolled, hollow lip on the back, it is a Semi-Tubular Rivet.
Q4: Should I use keluli tahan karat rivets on aluminum sheet metal?
Generally, no. As an engineer, you must account for Galvanic Corrosion. When dissimilar metals (like stainless steel and aluminum) are in physical contact in the presence of an electrolyte (like rainwater or saltwater), the more active metal (aluminum) will act as an anode and aggressively corrode. If you must use stainless rivets in aluminum for sheer strength, the rivets must be coated with a dielectric sealant (like zinc chromate primer) before installation.
The Engineer’s Verdict: Permanent Fastening Done Right
To answer the foundational question—what is the definition of a rivet?—it is the ultimate expression of permanent mechanical joining.
When you design a bolted joint, you are always fighting the physics of vibration, thermal expansion, and torque relaxation. When you design a riveted joint, you are permanently marrying two pieces of material through plastic deformation.
However, as we have explored, a rivet is only as good as the engineer who specified it and the technician who set it. You must calculate the exact grip length, select the appropriate diameter, respect the galvanic properties of the materials, and apply the precise amount of kinetic energy to form the buck-tail. By mastering these variables, you ensure your assemblies remain rigid, safe, and impervious to the harshest mechanical environments.
Rujukan
To standardize your internal manufacturing SOPs and ensure your assemblies meet global safety regulations, please integrate the following engineering standards into your quality control matrix:
- ASME B18.1.1 (Small Solid Rivets) & ASME B18.1.2 (Large Rivets)
The American Society of Mechanical Engineers provides the definitive dimensional standards, head profiles (Countersunk, Universal, Pan head), and tolerance limits for solid rivets used in structural steel and mechanical engineering.
Pautan: ASME.org - FAA Advisory Circular AC 43.13-1B (Chapter 4: Metal Structure, Welding, and Brazing)
The Federal Aviation Administration’s bible on structural aircraft repair. It provides exhaustive tables on calculating rivet layouts, edge distances, and proper bucking techniques for aluminum sheet metal.
Pautan: FAA.gov