eptahub.comで12年間CADアセンブリと機械部品表(BOM)をレビューしてきた中で、リベットほどジュニアデザイナーに広く誤解されているファスナーはほとんどありません。誰かが私に尋ねると、, “「リベットをどのように定義するか?」”, 彼らは通常、辞書で簡単に答えられるような答えを探している。.
検索する場合 スラングで「rivet」とはどういう意味ですか? それは、何かに完全に夢中になったり、魅了されたりすることを意味することがわかるでしょう(例:「心を奪われるようなパフォーマンス」)。しかし、工場の現場では、言葉の曖昧さは一切許されません。.
エンジニアにとって、, リベットの定義は何ですか?
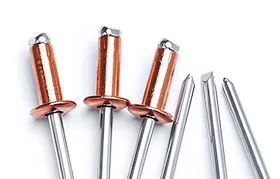
リベットは、ねじ山のない永久的な機械的締結具で、片端に予め成形された頭部を持つ滑らかな円筒形の軸で構成されています。取り付け時に、反対側の端(尾部)が機械的に変形され、2つ目の頭部が形成され、2つ以上の材料をしっかりと固定します。.
摩擦とねじ山の張力に依存するボルトやネジとは異なり(そして振動で緩む可能性がある)、適切に取り付けられたリベットは構造的な変形を利用します。リベットは取り付け穴を完全に埋め、非常に強固で振動に強い接合部を形成します。リベット接合部は、物理的にファスナーを破壊しない限り分解することはできません。.
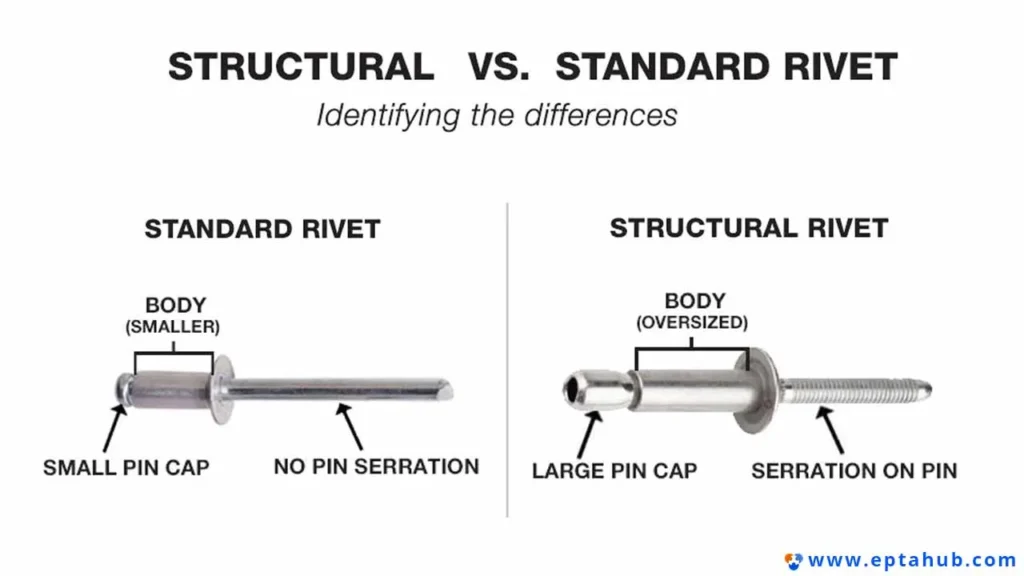
リベットには4つの種類があります。
ファスナーを指定する前に、何が利用可能かを知る必要があります。数十種類のニッチなバリエーションがありますが、現代の 工業生産 は主に4種類の鋲に依存しています。これらを理解することが学習の第一歩です。 リベットの識別方法 技術図面上で。.
1. ソリッドリベット(構造上の重量級部品)
これは最も古く、最も原型に近いリベットで、エッフェル塔やゴールデンゲートブリッジ、現代の航空機の胴体などの建設に用いられたことで有名です。頭部が付いた金属製の円筒形です。.
- 力学: 頑丈なリベットを取り付けるには、 両方 アセンブリの側面。尾部に大量の力(通常は空気圧リベットガンと重いバッキングバーを介して)を加えて、尾部を「バックテール」に叩きつけます。“
- 工学的応用: 絶対的な最大せん断強度と引張強度が要求される場合、およびアセンブリが極端で連続的な振動にさらされる場合(航空宇宙分野など)に指定されます。.
2. ブラインドリベット/ポップリベット(組立ラインの標準)
デザイナーが私に尋ねると 金属にリベットを取り付ける方法 筐体の片側しかアクセスできない場合(例えば、管状のフレームや密閉された箱など)、解決策はブラインドリベットです。.
- 力学: ブラインドリベットは、中空の管状本体と中央のマンドレル(釘のようなピン)で構成されています。専用工具でマンドレルを中空本体に通し、リベットのブラインド側を拡張させ、所定の張力でマンドレルを意図的に折る仕組みです。.
- 工学的応用: 標準的な板金加工、自動車の車体加工、空調ダクト工事などに使用されます。取り付けは非常に迅速ですが、芯が中空(または折れたマンドレルで塞がれている)であるため、ソリッドリベットよりもせん断強度が低くなります。.

3. 半管状リベット(支点)
これらは頑丈なリベットのように見えるが、尾の先端に浅い穴が開けられているのが特徴だ。.
- 力学: 尾部が中空になっているため、端を外側に巻き出して接合部を固定するのに必要な力は大幅に少なくて済みます(固体リベットの約4分の1の力で済みます)。.
- 工学的応用: これらは、ジョイントが回転または旋回する必要がある場合(折りたたみ式はしご、はさみ、自動車のブレーキなど)によく使用されます。また、質問する際にも標準となっています。 革にリベットを取り付ける方法 またはプラスチック製。取り付け力が低いため、柔らかい基材が潰れるのを防ぐことができる。.
4. ブラインドリベットナット/リベットナット(スレッドクリエーター)
エンジニアは、重い部品を 板金 内ねじを切るには薄すぎる。このような場合は、リベットナットを使用する。.
- 力学: 知っている リベットナットの取り付け方 これは筐体設計において非常に重要です。取り付け方法はブラインドリベットと全く同じですが(片側から)、ソリッドテールではなく、内部にねじ山が切られた、永久的に固定されたナットが残ります。.
- 工学的応用: 電子機器のシャーシパネル、自動車のダッシュボード、航空宇宙機器の内装など、薄肉構造物から部品を繰り返しボルトで固定したり取り外したりする必要がある箇所。.
リベットの仕様をどのように指定すればよいですか?
eptahub.comで機械アセンブリによく見られる故障は、間違った部品が取り付けられていることではない。 タイプ リベットの、しかし間違った サイズ. 寸法を推測することはできません。 リベットの仕様をどのように指定すればよいですか?, そのため、接合する材料の厚さに基づいて、2 つの重要な幾何学的値を計算する必要があります (グリップ長さとして知られています)。.
ステップ1:リベットの直径の測定方法
リベットの直径は、そのせん断強度、つまり接合部に平行に働く力に対する抵抗力を決定します。直径が小さすぎると、リベットはまるでギロチンで切断されたピンのように簡単に折れてしまいます。逆に直径が大きすぎると、必要な穴を開ける際にベースプレートから過剰な材料が除去され、構造全体が弱体化してしまいます。.
- 工学における経験則: リベットの直径(d) およそ 最も厚い板の3倍の厚さ 参加しています。.
- 例: 2mm厚のアルミ板を1mm厚のアルミ板にリベット留めする場合、最も厚い板は2mmです。したがって、最適なリベット径は 3×2mm=6mm. (実際には、6.4mmまたは1/4インチのリベットなど、最も近い標準サイズを選択します。).
ステップ2:リベットの長さの決定方法
長さの計算は、致命的なエラーが発生する箇所です。リベットの長さ(L)は、接合される材料の総厚(グリップ長さ)と等しくなければなりません。 プラス バックテールをうまく形成するのに十分な追加材料。.
リベットが短すぎると、形成される尾部が小さすぎて穴から抜け落ちてしまいます(引き抜き不良)。リベットが長すぎると、尾部が形成される前にシャフトが穴の中で曲がったり座屈したりして、緩んでガタガタする接合部になります。.
- ソリッドリベットの公式: L = グリップの長さ + (1.5 × d)
(どこ d はリベットの直径です。1.5倍の係数により、標準的な平型バックテールを形成するために必要な金属の正確な体積が算出されます。. - ブラインドリベットの公式: ブラインドリベットは「グリップ範囲」(例:0.126インチ~0.250インチ)で販売されています。材料の総厚を測定し、その厚さが指定されたグリップ範囲の中央値にぴったり合うブラインドリベットを選択するだけで済みます。.
エンジニアリングサイズマトリックス:標準ソリッドリベットの計算
CADモデルを作成する際の参考として、ソリッドリベットの寸法を決定するための標準的な計算マトリックスを以下に示します。.
| 材料1 厚さ(t1) | 材料2 厚さ(t2) | グリップ全長(G) | 計算された最適直径(d=tmax×3) | 標準直径が選択されました | 必要なリベットの長さ(L=G+1.5d) |
|---|---|---|---|---|---|
| 1.0 mm | 1.0 mm | 2.0 mm | 3.0 mm | 3.2 mm (1/8インチ) | 2.0+(1.5×3.2) = 6.8 mm |
| 2.0 mm | 1.5 mm | 3.5 mm | 6.0 mm | 4.8 mm (3/16インチ) | 3.5+(1.5×4.8) = 10.7 mm |
| 3.0 mm | 3.0 mm | 6.0 mm | 9.0 mm | 6.4 mm (1/4インチ) | 6.0+(1.5×6.4) = 15.6 mm |
(注:常に市販されている標準的なリベットの長さに切り上げ、技術図面には正確な穴の公差を指定してください。通常はリベットの直径より0.1mm大きくなります。).
エンジニアリング事例研究:リベットの長さの誤りによる壊滅的な故障
これらの数式がなぜ重要なのかを強調するために、eptahub.comで実施した、業務用高耐久性屋上設置型空調設備を製造する顧客向けの故障解析事例をご紹介しましょう。.
シナリオ: 顧客は、空調設備の外部亜鉛メッキ鋼製シャーシを組み立てていました。設計では、16ゲージ(1.5mm)の鋼板2枚を重ね合わせて接合する必要がありました。全把持長は正確に3.0mmでした。若手エンジニアは、把持範囲が1.5mmから3.2mmの4.8mm(3/16インチ)アルミニウム製ブラインドリベットを指定しました。.

隠された失敗: 理論上、3.0mmの材料厚さは1.5mm~3.2mmのグリップ範囲内に収まるはずだった。しかし、エンジニアは板金製造の現実を考慮に入れていなかった。 バリ.
工場で打ち抜かれた穴のバリが完全に除去されていなかったため、2枚の鋼板が完全に平らに合わなかった。プレート間には0.5mmの微細な隙間があった。これにより、 実際の 物理的な把持長が3.5mmに達し、選択したリベットの最大容量を超えている。.
結果: 空気圧工具がマンドレルを引き抜くと、リベットの裏側が膨張しようとした。 内部 底板の裏側ではなく、穴の方に接合されていた。組み立てラインでは接合部がしっかりしているように見えたが、構造的な締め付け力はほとんどなかった。HVACユニットが商業施設の屋上に設置されると、内部コンプレッサーファンの激しい振動により、リベットに深刻なせん断応力がかかった。6か月以内にリベットが折れ、シャーシパネルが激しくガタガタと音を立て始め、多額の保証請求につながった。.
エンジニアリングの解決策:
組み立て工程を再設計し、部品表に3つの大幅な変更を加えました。
- 必須のバリ取り: 標準作業手順書に、すべての板金穴のバリ取りが完全に行われていることを確認する手順を追加し、金属同士が確実に接合されるようにしました。.
- 改良された素材: シャーシの電気化学的特性に合わせ、せん断強度を大幅に向上させるため、アルミニウム/アルミニウム製のブラインドリベットからスチール/スチール製のブラインドリベットに変更した。.
- 補正後のグリップ範囲: グリップ範囲が3.2mmから4.8mmの新しいブラインドリベットを指定しました。これにより、わずかな隙間があってもブラインドヘッドが完全に成形されることが保証されます。 後ろに 底板を固定することで、恒久的で高張力の機械式ロックが形成される。.
ここでの教訓は絶対的なものです。 リベットの指定方法, そのためには、理論的なCAD寸法だけでなく、工場現場での組み立てにおける物理的な現実も計算する必要があります。.
How to Set Rivets in Metal: The Industrial Standard
When engineers discuss 金属にリベットを取り付ける方法, we are primarily dealing with high-shear structural applications (aerospace, automotive, HVAC).
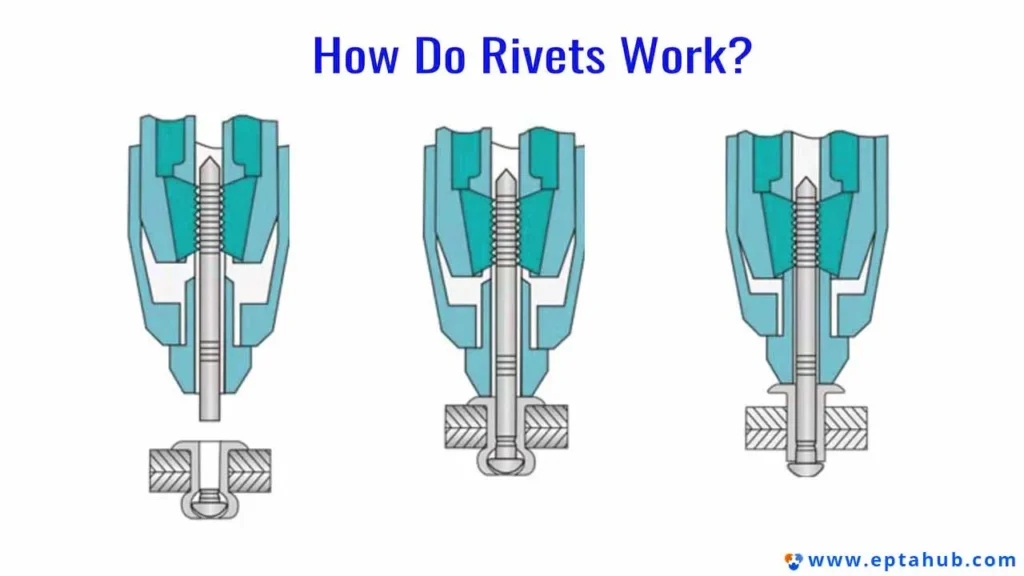
1. Setting Blind Rivets (Pop Rivets) in Sheet Metal:
This is the most common assembly line operation.
- The Process: You drill a clearance hole through both plates (typically 0.1mm larger than the rivet body). Insert the blind rivet through the hole until the flange sits perfectly flush against the top plate. Slide the nosepiece of a manual, pneumatic, or battery-operated rivet gun over the protruding mandrel (the central nail).
- 物理学: Squeeze the trigger. The tool pulls the mandrel aggressively backward while pushing against the flange. The ball at the end of the mandrel forces the hollow tail of the rivet to flare out radially behind the bottom plate. Once the flare compresses the plates together with maximum tension, the mandrel reaches its ultimate tensile strength and snaps off with a loud pop.
2. Setting Solid Rivets with a Squeezer:
For high-end aerospace or aircraft frames, we do not use impact force if we can avoid it. We use a pneumatic or hydraulic “squeezer.” This C-shaped tool features two cupped dies. It slowly and silently crushes the solid rivet tail with thousands of pounds of hydraulic pressure. This creates a perfectly uniform, work-hardened buck-tail without damaging the surrounding delicate aluminum skin.
How to Set Rivets with a Hammer?
Not every operation has access to hydraulic squeezers. When performing field repairs, custom fabrication, or restoring vintage machinery, you must know how to set rivets with a hammer.
Warning: You cannot simply hit a solid rivet flat with a standard framing hammer. Hitting it flat will bend the shank inside the hole, completely destroying the joint’s shear strength.
The Proper Engineering Technique:
- The Anvil (Bucking Bar): The factory head of the rivet must be supported by a massive piece of hardened steel, known as a bucking bar or anvil. If the head is not supported, your hammer blows will simply push the rivet out of the hole.
- The Rivet Set: You place a “rivet set”—a specialized steel punch with a concave dimple matching the rivet head—over the factory head to protect its shape.
- The Peening Process: Using a ball-peen hammer, you strike the protruding tail of the rivet. You do not hit it dead-center immediately. You use the rounded “ball” end of the hammer to strike the edges of the tail in a circular motion. This “peens” or mushrooms the metal outward radially, filling the hole completely.
- The Finish: Once the metal is mushroomed, you flip to the flat face of the hammer and strike it dead-center to flatten the buck-tail against the base metal, securing the joint.
Navigating Soft Materials: Leather and Fabric
At eptahub.com, we frequently review Bills of Materials for tactical gear, heavy-duty tarps, and industrial safety harnesses. The rules for metal do not apply here.
If you use a high-tension steel blind rivet on canvas or leather, the clamping force will act like a hole punch. The moment load is applied, the rivet will tear straight through the soft material.
How to Set Rivets in Leather
When specifying hardware for thick leather (belts, tool pouches, horse tack), you must distribute the clamping load over a wide surface area. This dictates 革にリベットを取り付ける方法.
We typically specify Copper Rivets and Burrs または Double-Cap Rivets.
- Copper Rivet & Burr Installation: You push a solid copper rivet through the punched leather. A tight-fitting copper washer (the burr) is forced down over the shaft until it compresses the leather. You then use heavy nippers to cut the copper shaft, leaving just 2mm protruding. Finally, using a domed setting tool and a mallet, you peen the soft copper shaft over the washer. The washer prevents the rivet from pulling through the leather.
- Double-Cap Rivets: These are snap-together tubular rivets used for lighter leatherwork. They have a finished cap on both ends. You punch a hole, push the post through, snap the cap on, and use a specialized concave anvil and setting punch. You strike the punch with a mallet to gently compress the internal tube, locking the caps together without crushing the leather.
How to Set Rivets in Fabric
The challenge of how to set rivets in fabric (like Kevlar, nylon webbing, or canvas tarps) is preventing the woven fibers from fraying around the hole.
- The Engineering Solution: You must never drill fabric; the drill bit will catch and unravel the weave. You must use a sharp, heated hole punch to melt or cleanly sever the fibers.
- The Hardware: For fabrics, we almost exclusively specify Tubular Rivets または Grommets/Eyelets paired with massive backing washers. The wide flange of the grommet or the backing washer ensures the mechanical load is distributed across hundreds of individual fabric threads, preventing tear-out under high wind or tension loads.
Field Operations: How to Set Rivets Without a Tool
Occasionally, a technician in the field needs to repair a linkage or a canvas strap and does not have a specialized pop-rivet gun, a bucking bar, or a concave rivet set. When you search for how to set rivets without a tool, you are looking for an improvised engineering solution.
Disclaimer: Improvised setting methods should never be used on load-bearing structural joints (like automotive suspensions or aircraft).
Improvising a Tubular Rivet Setting:
If you need to set a semi-tubular rivet or a grommet and lack the specialized flaring die:
- The Base: Place the factory head of the rivet against a hard, flat metal surface (the flat spot on a bench vise or a heavy steel plate).
- The Improvised Flare: Take a steel ball bearing that is slightly larger than the hole in the tubular tail of the rivet. Place the ball bearing on top of the hollow tail.
- The Strike: Strike the ball bearing squarely with a flat hammer. The spherical shape of the ball bearing will act exactly like a flaring die, perfectly rolling the edges of the tubular rivet outward. Finish by removing the ball bearing and lightly tapping the flared edges flat with the hammer.
よくある質問
To optimize your production line and troubleshoot common failures, here are the most frequent technical questions we field regarding rivet installation.
Q1: I installed a blind rivet, but the mandrel (stem) snapped off above the flange, leaving a sharp pin sticking out. Why?
This is a classic failure called “proud mandrel.” It happens for two reasons. First, your grip length calculation was wrong—the rivet was too long for the thin material, so the mandrel snapped before it could pull fully into the body. Second, the nosepiece on your rivet gun is worn out or the wrong size, preventing the jaws from gripping the mandrel deep enough.
Q2: Can I remove a rivet once it is set?
Rivets are permanent fasteners; they cannot be unscrewed. To remove a rivet, you must destroy it. The engineering standard is to drill it out. Select a drill bit exactly the same size as the specified rivet diameter (not the hole diameter). Center-punch the exact middle of the rivet head. Drill straight down just until the factory head spins off on the drill bit. Then, use a parallel pin punch to tap the remaining shaft completely out of the hole. Do not drill all the way through, or you will enlarge the base hole.
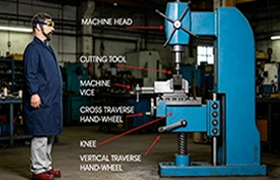
Q3: How to identify rivets visually on a piece of machinery?
- If it has a solid, smooth, domed head on one side, and a smashed, irregular mushroom of metal on the back, it is a Solid Rivet.
- If it has a smooth flange on the front with a tiny hole in the exact center (where the mandrel snapped), and a bulged, hollow tube on the back, it is a Blind (Pop) Rivet.
- If it has a rolled, hollow lip on the back, it is a Semi-Tubular Rivet.
Q4: Should I use stainless steel rivets on aluminum sheet metal?
Generally, no. As an engineer, you must account for Galvanic Corrosion. When dissimilar metals (like stainless steel and aluminum) are in physical contact in the presence of an electrolyte (like rainwater or saltwater), the more active metal (aluminum) will act as an anode and aggressively corrode. If you must use stainless rivets in aluminum for sheer strength, the rivets must be coated with a dielectric sealant (like zinc chromate primer) before installation.
The Engineer’s Verdict: Permanent Fastening Done Right
To answer the foundational question—リベットの定義は何ですか?—it is the ultimate expression of permanent mechanical joining.
When you design a bolted joint, you are always fighting the physics of vibration, thermal expansion, and torque relaxation. When you design a riveted joint, you are permanently marrying two pieces of material through plastic deformation.
However, as we have explored, a rivet is only as good as the engineer who specified it and the technician who set it. You must calculate the exact grip length, select the appropriate diameter, respect the galvanic properties of the materials, and apply the precise amount of kinetic energy to form the buck-tail. By mastering these variables, you ensure your assemblies remain rigid, safe, and impervious to the harshest mechanical environments.
参考文献
To standardize your internal manufacturing SOPs and ensure your assemblies meet global safety regulations, please integrate the following engineering standards into your quality control matrix:
- ASME B18.1.1 (Small Solid Rivets) & ASME B18.1.2 (Large Rivets)
The American Society of Mechanical Engineers provides the definitive dimensional standards, head profiles (Countersunk, Universal, Pan head), and tolerance limits for solid rivets used in structural steel and mechanical engineering.
リンク: ASME.org - FAA Advisory Circular AC 43.13-1B (Chapter 4: Metal Structure, Welding, and Brazing)
The Federal Aviation Administration’s bible on structural aircraft repair. It provides exhaustive tables on calculating rivet layouts, edge distances, and proper bucking techniques for aluminum sheet metal.
リンク: FAA.gov