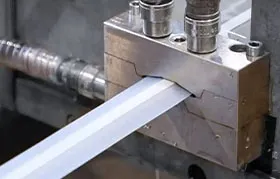
Hello again. It’s your Eptahub engineer. If you’ve ever looked at an aluminum window frame, a T-slot rail for a workbench, or the intricate fins of a heat sink and wondered how such a complex, continuous profile is made, you’ve been looking at an extrusion.
The core concept of extrusion is as simple as squeezing toothpaste from a tube. But in that simplicity lies a powerful manufacturing process that allows us to create incredibly complex cross-sections at a relatively low cost, especially at scale. I’ve relied on extrusion to solve design challenges ranging from custom electronics enclosures to lightweight structural frames.
However, the difference between a cost-effective, high-quality extruded part and a problematic, expensive one often comes down to understanding the nuances of the process. This guide is built for the person who needs to make smart decisions—the design engineer defining tolerances and the purchasing manager sourcing the final product.
We’re going to cover:
- The core mechanics: How extrusion works on a physical level.
- The primary methods: Direct vs. Indirect extrusion and the critical differences between them.
- The role of temperature: A practical look at hot vs. cold extrusion.
- Designing for Manufacturability (DFM): The “golden rules” for designing profiles that are easy to produce and less likely to fail.
- Material selection: Why aluminum is king, and what your options are.
- A step-by-step guide to building a perfect RFQ for extruded components.
Let’s push a billet through a die.
Shaping Metal Like Toothpaste
In the simplest terms, extrusion is a compression process where a material is forced to flow through a die, a tool with a specific cross-sectional profile. The material emerges from the other side of the die as a continuous, elongated piece with the same profile as the die opening.
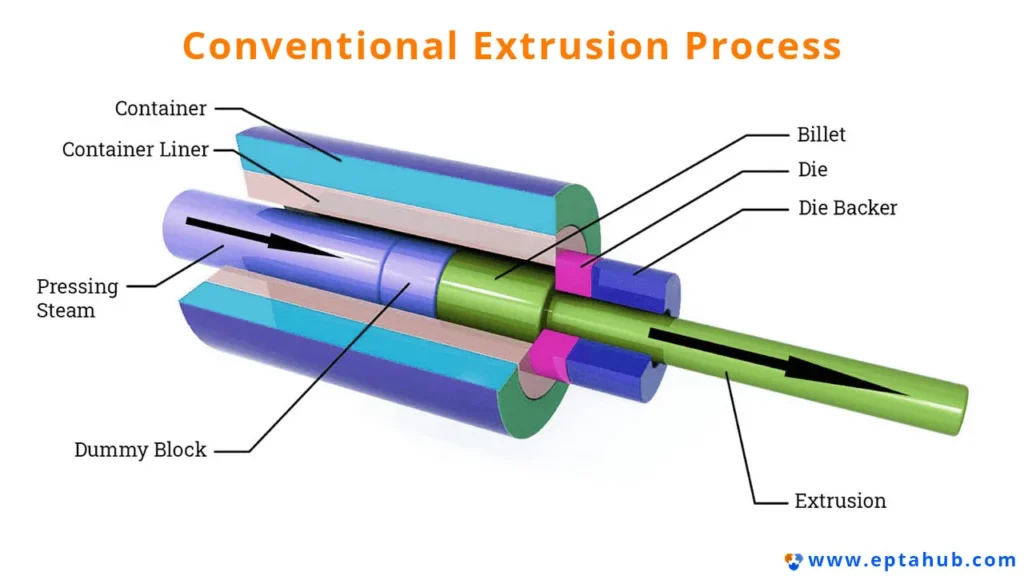
The key players in this process are:
- The Billet: This is the raw material, a solid log or cylinder of the material to be extruded (e.g., aluminum, copper, plastic).
- The Container: A heavy-walled chamber that holds the billet under pressure.
- The Ram (or Plunger): A piston that applies immense pressure to the back of the billet, forcing it forward.
- The Die: A hardened steel disc with a cutout of the desired final profile. This is the heart of the operation and where the real “magic” happens.
The process is straightforward: The billet (often pre-heated) is placed in the container. The ram pushes the billet with thousands of tons of force against the die. The immense pressure forces the material to plastically deform and flow through the die opening, emerging as the final profile. The long extrusion is then cooled, stretched to relieve internal stresses, and cut to the desired lengths.
Direct vs. Indirect Extrusion: Which Method is Used?
While the concept is simple, there are two primary ways to accomplish it: directly or indirectly. The choice affects the required force, the tooling, and the quality of the final product.
Direct Extrusion (Forward Extrusion)
This is the oldest and most common method. In direct extrusion, the billet slides forward relative to the container wall as the ram pushes it toward the stationary die.
- Analogy: Think of a standard syringe. You push the plunger (the ram), which forces the liquid (the billet) past the walls of the syringe barrel (the container) and out through the needle (the die).
- Pros: Simpler tooling and press setup. A versatile and well-understood process.
- Cons: The major drawback is the immense friction generated as the entire billet slides along the container walls. This requires significantly more force, and this force varies as the billet gets shorter, which can lead to non-uniform properties.
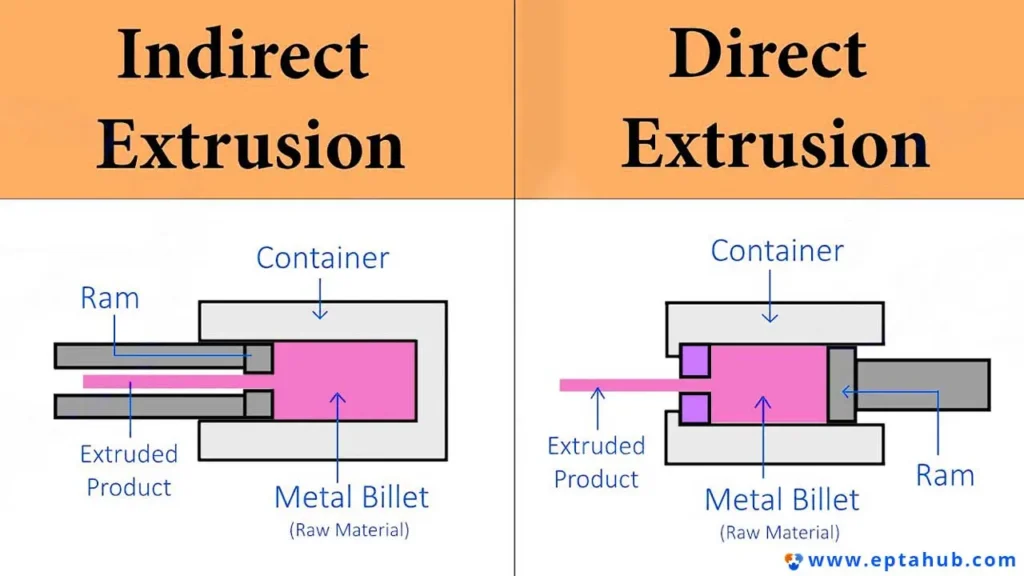
Indirect Extrusion (Reverse Extrusion)
In this more advanced method, the die is mounted on the front of a hollow ram. The ram pushes the die into the billet, which is held stationary in the container. The material flows backward through the die and out through the hollow ram.
- Analogy: Imagine a capless syringe. You hold the plunger stationary and push the syringe barrel over it. The liquid flows out through a hole in the plunger.
- Pros: Friction is almost eliminated, which means less force is required and the force remains constant. This leads to more uniform mechanical properties and less waste.
- Cons: The tooling is more complex and the profile size is limited by the internal diameter of the hollow ram.
Table 1: Direct vs. Indirect Extrusion—An Engineer’s Comparison
| Feature | Direct Extrusion (Most Common) | Indirect Extrusion |
|---|---|---|
| Friction | High (billet moves against container wall) | Low (billet is stationary relative to container) |
| Required Force | High and variable | Lower and more consistent |
| Grain Structure | Can be less uniform along the length | More uniform and consistent |
| Best For | Standard profiles, solid shapes, lower-cost applications. | High-precision profiles, complex hollow shapes, alloys sensitive to friction. |
Hot vs. Cold Extrusion: The Role of Temperature
The temperature at which extrusion occurs has a massive impact on the process and the final product’s properties.
Hot Extrusion
This is by far the most common type of extrusion, especially for aluminum and copper alloys. The process is performed at elevated temperatures, well above the material’s recrystallization temperature (for aluminum, this is typically in the range of 350-500°C / 660-930°F).
- Why do it hot? Heating the billet makes the material soft and ductile. This dramatically reduces the force required to push it through the die and allows for the creation of very intricate and complex cross-sections.
- Key Trade-offs: This process allows for extremely complex shapes but results in a less-than-perfect surface finish (due to oxidation) and wider dimensional tolerances (due to thermal contraction).
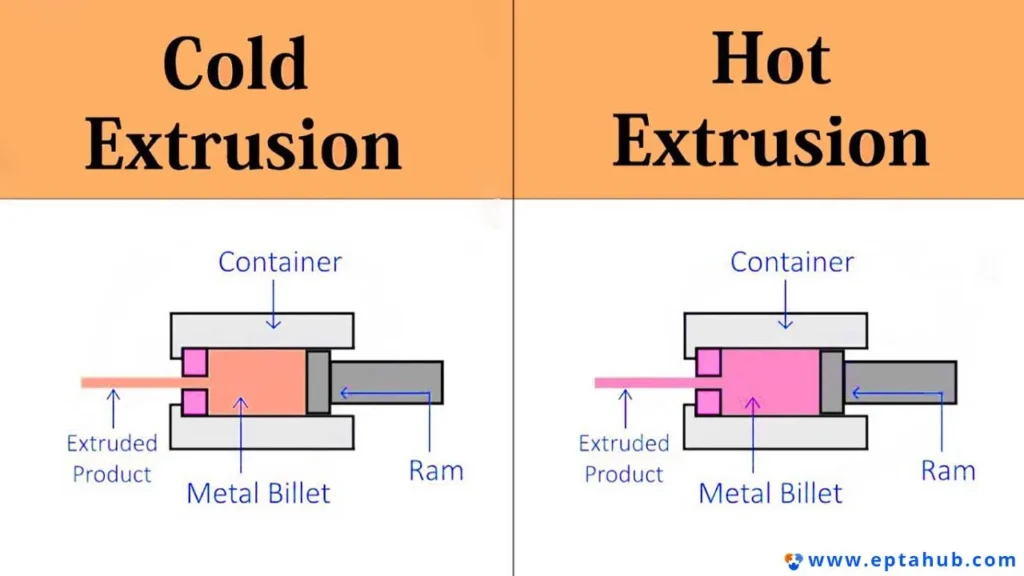
Cold Extrusion
Cold extrusion is performed at or near room temperature. Because the material is not softened by heat, it requires immense force to deform.
- Why do it cold? The primary benefit is the effect on the material’s properties. The process is a form of cold working, which leads to strain hardening. The final part is significantly stronger and harder than the raw material.
- Key Trade-offs: This process yields an excellent surface finish, tight tolerances, and improved mechanical properties. However, it requires massive force and is limited to simpler shapes.
Material Selection: Why Aluminum Is King
While you can extrude plastics, copper, brass, and even steel (with great difficulty), aluminum is the quintessential extrusion material. Over 70% of all extruded metal products are made from aluminum alloys.
Why is aluminum so perfect for extrusion?
- Excellent Extrudability: It has a relatively low melting point and is very ductile when hot, making it easy to push through complex dies.
- High Strength-to-Weight Ratio: This makes it ideal for structural applications where weight is a concern.
- Natural Corrosion Resistance: Aluminum instantly forms a tough, transparent oxide layer that protects it from the environment. This can be further enhanced with anodizing.
Common Aluminum Alloys for Extrusion:
- 6063 Aluminum: The most common extrusion alloy. It offers an excellent surface finish, high corrosion resistance, and is easily anodized. It’s the standard for architectural and cosmetic applications.
- 6061 Aluminum: A step up in strength from 6063. It’s a versatile structural alloy used for everything from machine frames to aerospace components. The surface finish is very good, though not quite as pristine as 6063.
Designing Smart Profiles: Key Rules for Manufacturability (DFM)
The cost and quality of your extruded part are largely determined during the design phase. A well-designed profile runs smoothly. A poorly designed one causes headaches for the extruder and adds cost for you. As an engineer who reviews these designs daily, here are the rules I look for first.
- Rule 1: Strive for Uniform Wall Thickness. This is the golden rule. A profile with walls of a consistent thickness will cool at a uniform rate, minimizing warping and internal stress. If you have a thick section connected to a thin section, the thin part will cool and shrink faster, potentially distorting the entire profile.
- Rule 2: Avoid Sharp Corners. Sharp internal and external corners are stress concentrators in the die, leading to premature wear and failure. They also impede smooth metal flow. Always add generous radii (a minimum of 0.5-1.0 mm is a good starting point).
- Rule 3: Keep it Symmetrical. Symmetrical profiles are easier to extrude because the pressure and metal flow are balanced. Asymmetrical shapes can create uneven forces on the die, making it harder to hold tight tolerances.
- Rule 4: Understand Hollows Add Cost. Solid profiles are extruded through a simple plate die. Hollow profiles (like a square tube) require a much more complex “spider” or “porthole” die, where the metal separates and re-welds itself in a chamber before exiting. These dies are more expensive to make and maintain. If you can achieve your design with an open profile, it will be cheaper.
- Rule 5: Mind the Aspect Ratio. Avoid extremely long, thin, unsupported features. A very tall, thin fin on a heat sink is much harder to extrude without distortion than a shorter, thicker one. A height-to-gap ratio of 10:1 is a common practical limit to keep in mind.
Case Study: Designing a Custom Heat Sink for an LED Fixture
- The Challenge: A client was developing a high-power industrial LED lighting fixture. Their initial prototype, using a stock heat sink, was overheating, causing the LEDs to fail prematurely. They needed a custom solution that maximized surface area for cooling within a tight enclosure.
- Why Extrusion? The long, thin, and complex fins required for a high-performance heat sink are impossible to machine cost-effectively. Extrusion was the only viable manufacturing process.
- Our Design Process (Applying DFM):
- Material Selection: We chose Aluminum 6063-T5. 6063 was selected for its excellent thermal conductivity and its ability to be extruded into profiles with thin, high-aspect-ratio fins. The T5 temper (artificially aged) provides good dimensional stability.
- Fin Design (DFM Rule 5): The engineers initially wanted extremely thin, tall fins. We ran a flow simulation and advised them that beyond a certain height-to-gap ratio (around 10:1), the fins become difficult to extrude without distortion and provide diminishing returns on cooling. We settled on a slightly shorter, wider fin that was more robust to manufacture.
- Base Thickness (DFM Rule 1): We ensured the base of the heat sink was thick and uniform to promote even heat spreading and to provide a stable foundation for the fins during the extrusion process.
- Mounting Holes: Instead of machining mounting holes later, we designed “screw bosses” directly into the extrusion profile. These are circular channels that can be drilled and tapped in a simple secondary operation, saving significant machine time.
- The Result: The final extruded heat sink performed 30% better than the stock solution, solving the overheating problem. By applying DFM principles from the start, we created a profile that was not only thermally efficient but also cost-effective to produce at scale.
How to Source Extrusions: Building the Perfect RFQ
A clear and complete RFQ package is the best way to get fast, accurate quotes. Here’s what your extrusion partner needs to see.
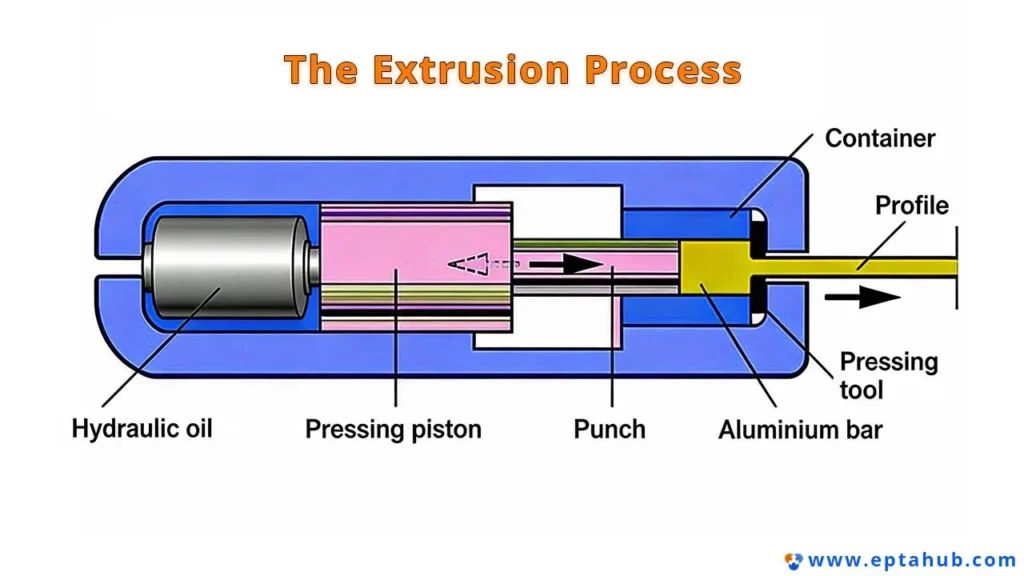
Table 2: The RFQ Checklist for Extruded Components
| Category | Information to Provide | Why It’s Critical for Your Supplier |
|---|---|---|
| 1. Profile Drawing / CAD | • A 2D drawing (PDF or DXF) showing the cross-section with all critical dimensions and tolerances clearly marked. | This is the single source of truth for the profile shape. We use this to design the die and for quality control. |
| 2. Alloy and Temper | • Specify the exact alloy and temper (e.g., “Aluminum 6061-T6” or “Aluminum 6063-T5”). | This is non-negotiable. The alloy determines the material’s properties (strength, finish, corrosion resistance), and the temper defines its final heat-treated state. “Aluminum” is not a sufficient spec. |
| 3. Tolerances | • Indicate standard commercial tolerances or specify any tighter tolerances on critical features. Be realistic. | Standard extrusion tolerances are wider than machining tolerances. Holding unnecessarily tight tolerances adds significant cost and complexity. |
| 4. Length and Quantity | • Cut Lengths: “Cut to 2000 mm ± 1 mm”. • Total Quantity: “Quote for 500 meters” or “Quote for 250 pieces at 2m each”. |
Pricing is heavily dependent on the total volume (weight) of the order, as this dictates how many billets we run. Setup costs for the die are amortized over the total run. |
| 5. Secondary Operations | • Clearly state if you require any additional processing, such as drilling, tapping, CNC machining, or cutting miters. | These are separate manufacturing steps that add cost and lead time. We need to know if we are quoting just the raw extrusion or a finished part. |
| 6. Finishing Requirements | • Specify the desired surface finish: Mill Finish (as-extruded), Anodized (specify type and color, e.g., “Clear Anodize, Type II, Class 1”), or Powder Coated (specify color). | Finishing is a critical step that affects appearance, durability, and cost. Anodizing also slightly affects dimensions, which must be accounted for. |
Frequently Asked Questions (FAQ)
Q: What is an example of extrusion?
A: You see extrusions everywhere. Common examples include: aluminum window and door frames, T-slot structural framing (like 80/20), electrical enclosures, heat sinks for electronics, tubing and pipes, handrails, and architectural trim.
Q: What is extrusion in simple terms?
A: It’s a manufacturing process that creates objects with a fixed cross-sectional profile by pushing material through a die of the desired shape. The simplest analogy is squeezing dough through a cookie press or toothpaste out of a tube.
Q: What is the most common type of extrusion?
A: Hot, direct extrusion of 6000-series aluminum alloys (like 6063 and 6061) is by far the most common type of metal extrusion performed worldwide.
Q: What is the difference between extrusion and injection molding?
A: Extrusion creates a continuous, linear profile of a single cross-section (like a pipe or a rail), which is then cut to length. Injection molding creates discrete, three-dimensional parts (like a plastic gear or a phone case) by injecting molten material into a closed mold. Think of extrusion as 2D shapes pulled into 3D, while molding creates fully 3D shapes in one shot.
Conclusion: A Foundation of Modern Manufacturing
Extrusion is a cornerstone process that enables engineers to create complex, lightweight, and strong profiles in a way no other process can. Its ability to place metal precisely where it’s needed—and only where it’s needed—makes it an elegant solution for an incredible range of structural and thermal challenges.
By understanding the fundamentals of the process, designing with manufacturability in mind, and providing a clear technical specification, you can unlock the full potential of extrusion. You can create parts that are not only functional and reliable but also highly cost-effective. Here at Eptahub, we live and breathe this process, helping our clients turn a simple billet into the backbone of their next great product.
References
1.ASTM B221-21, “Standard Specification for Aluminum and Aluminum-Alloy Extruded Bars, Rods, Wire, Profiles, and Tubes,” ASTM International. https://www.astm.org/b0221-21.html
2.Extrusion Technology for Aluminum Profiles Foundation (ET Foundation). https://www.etfoundation.org/